Wednesday, March 25, 2015

Playdate Thursday - Flying Unicorn

Hi everyone! It is Playdate Thursday at the Flying Unicorn and I have a mixed media bottle to share. I have altered an Iced Wine bottle…it is about 14 inches tall. This is to show you how I create texture and color for backgrounds…its basically the same way I do a canvas.
 
The first thing is to give it a coat of Gesso…I have used Golden Gesso. Heat set or let dry.
 

Next I coverd the gesso with a coat of Golden Regular Gel. This is to create a harder coat on top of the gesso and it will not peel off of the bottle. Heat set or let dry.
 
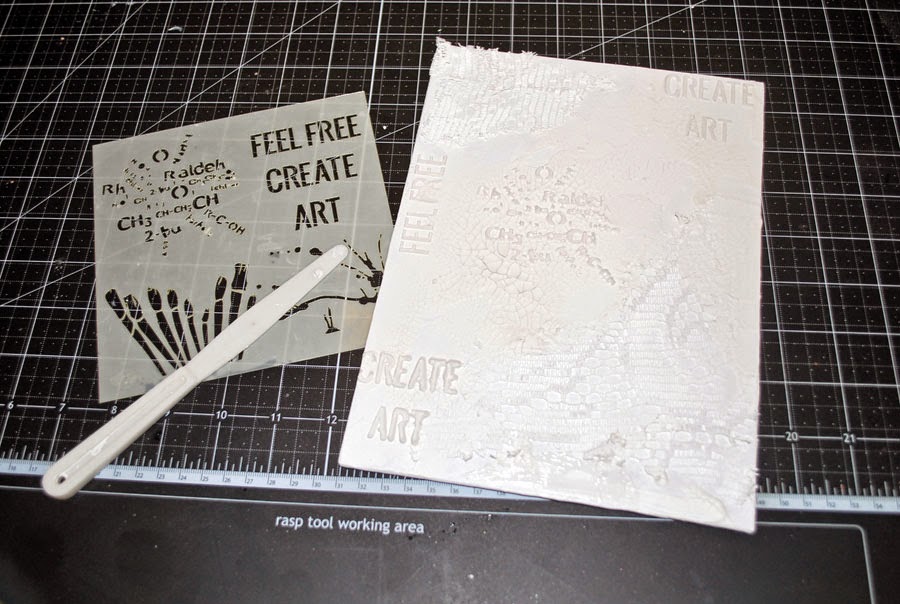
Lets add some more texture with some 13 ARTs Stencils and Golden Molding paste. Heat set or let dry.
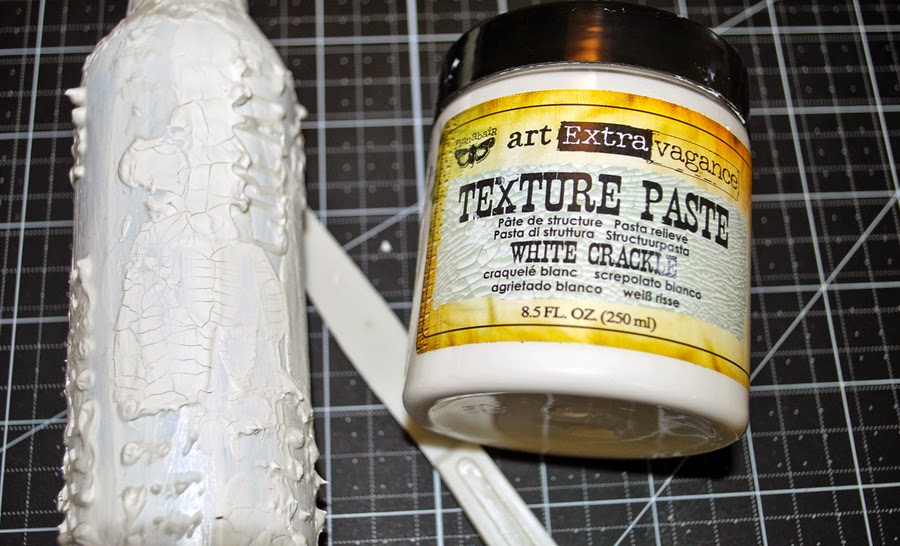
My next step I added a thick layer of Finns Crackle Texture Paste…only here and there did I add it. I did not cover up the masking I did on the above step, but want some crackle to show on some areas. Now this takes a while to dry. I think it took about 2 hours for mine to dry naturally. This allows nice crackle affect…so be patient and let air dry.
 
While I waited for my crackle to dry I picked out some embellishments and added a coat of gesso to them. You can heat set these.
 

Here is the crackle all nice and dry….LOVE this crackle paste.


I now add all of the embellishments to the bottle. The Creative Embelishment clock face folded nicely around the bottle curve. Just hold it in place until the glue sets. I also added a piece of Flying Unicorn Venice Lace around the bottom of the bottle.
 
I used 3 Shimmerz Vibez mists from the Mono and Ocean Tonez sets. I started with the lightest blue, next up was the taupe color and finished it with the darker blue. Heat set between each color…this stops the colors from mixing. I love how it seeps into the crackle.
 
After the above step is all dry….I did some dry brushing with gesso. Dry Brushing is just justing a wider paint brush or fan paint brush. Add a wee bit of gesso and gently stroke over the raised areas on the bottle. I you look at the close up of the lace you can see the colors underneath but the white dry brushing on top. I also did this on the stencil parts.
 
Continue the dry brushing on the flowers and vines. This softens the look.
 
I added a Prima resin bird and added touches of Shimmerz Brass Knuckles Inklingz. I also added wee drops of Inklingz over the bottle and misted a bit with water to let it all drip.
 
That is it! Here is my bottle…you can use as just a decoration or add a single Gerber flower and  use as a vase!


Have a great week everyone!
 

Products used:
Golden Gesso, Molding Paste and Gel
Prima Flowers
Finnabair Texture Crackle
13 ART Stencils
Shimmerz Tonez Sets and Inklingz
Creative Embelllishments chippy
 Prima Resin
 Flying Unicorn Venice Lace
http://www.flyingunicornstore.com/category_s/30.htm


Friday, March 20, 2015

Flying Unicorn March Your Passion Your Art Cards and Tags


Hi everyone! I am back with another share from the gorgeous Flying Unicorn March Kit. I have 3 cards to share. Presales are on now for the April kit too so check that out!  I loved the March kit with the bright yellows…it definitely helped me get out of the winter blues around where I live! To me the colors just scream SPRING!


There were many fun pieces to play with in this kit. I added many layers of these pieces on my cards and tag.


Beautiful resins, flowers and metal embellishments.


Well that it for today! Make sure to head on over to FlyingUnicorn store. Pre sales for the April kits us now and the kits go fast! Take care and happy scrapping J

Tuesday, March 17, 2015

Dream - Creative Emblellishments and Prima BAP

Hello everyone!  I am up on the Creative Embellishments Blog today and have a layout to share that I used the Prima BAP -  Jennifer Snyder sketch as my starting point. This layout was very fast to create and it is one of my favs so far.  The papers are Prima Timeless Memories from the Flying Unicorn store.
 
 
In the background I have used the Distressed Text Stamp…this is a go to stamp for me and I use it all the time.
 

I have tucked in pieces of the Flourish Set 10 here and there with the clusters. Another huge go to chippy piece for me. Just adding in bits and pieces here and there add so much to your creations, this detailed flourish looks amazing in clusters of Prima flowers!
 

My last close up you can see the title piece from the DreamWord Set. If you do not have any of the word sets yet they are a must have for me..and there are so many pieces in each set, check them out in Creative Embellishment store!
 

That is it for me for today! Don’t forget to check out the March challenge and play along with us!  Make sure to share all of your creations on our Facebook page. Take care and happy Scrapping!
 

Creative Embellishments Products:

Saturday, March 14, 2015

Mixed Media Challenge - Flying Unicorn


Hi everyone! I am hosting the March Mid Month Mixed Media Challenge at the Flying Unicorn and here is my project. You can do journal pages, tags, cards, canvas’s…what ever you like as this is a free for all mixed media challenge. Just make sure to share what techniques you have used on your projects!
 

My project a canvas and here are the steps I did creating it. 


First I covered my canvas in Gesso and when that dried I added some lace fabric pieces with some Soft Gel. I also added some Finnabair Texture Paste in a few spots…put it on quite thick and let that air dry to get some nice cracks. The lace is just from an old tablecloth I cut up.


Add some masking with a 13 ARTS mask and some Golden Molding paste.


I pre painted a few flowers and Creative Embellishments pieces with gesso and added to the canvas.


Start added some color with some Shimmerz mists. I added water to keep this part not too dark.


Do some dry brushing with gesso over the embellishments. I also did it over the masking to make it pop more on the canvas.


Add brighter colors of Shimmerz mists.


Come on over to the Flying Unicorn forums and join in on the fun! Take care and happy Scrapping!

Thursday, March 12, 2015

XO Canvas with Shimmerz


Hello everyone! I am up on the Shimmerz blog today with a canvas I have created with some of my favourite Shimmerz colors! After I have adheared all of my pieces on the canvas and applied a coat of gesso it was time to add some color with Shimmerz.


The background is a combination of Coloringz in Well Blue Me Down, Oh Say Can U Sea and Don’t Be Suede. I just love these three in combo!


The Flying Unicorn metal adornments and flowers all have touches of Spotlight White and Brass Knuckles Inklingz on them. The Inklingz are full of Shimmer!


A couple more close-ups.


On your next Shimmerz order, mention my name (in the notes to merchant) and Stacey will send you a sample for FREE!!!! Swing on by our Facebook page for more inspiration and watch out for giveaways! Take care and happy Scrapping!

Friday, March 6, 2015

HOPE - Creative Embellishments

Hello everyone!  Today I am up on the Creative Embellishment Blog and I have a fun layout to share….and that is me…that is rare for me to actually scrap a photo of just me! I used Marion Smith Garment Collection from the Flying Unicorn store.


I left the chippys naked for this one…I love the natural color of them and sometimes they do not require anything on them! The title is from the Dream Word Set. These title word sets are amazing and there are a few in each pack. Check them out in the store!
 
 
The photo is framed with the NEW Large Clock Face. Sorry my photo of that does not show you the detail on this fabulous new chippy. I have also used the Distressed Text Stamp here and there on the background.

 
One more close up. I have used lots of Shimmerz on the background and embellishments and metals from the Flying Unicorn store.


That is it for me for today! Don’t forget to check out the new March challenge and play along with us!  Make sure to share all of your creations on our Facebook page. Take care and happy Scrapping!

Creative Embellishments Products: